I love vanilla flavor. Even though it’s not an essential ingredient in smoothies or other recipes (and I don’t think it has any significant health benefits), it’s certainly one of the most delicious additions.
Vanilla extract is an ingredient in so many cooking and baking recipes that it’s almost automatic to add it in when you’re making cookies or pancakes, so when you see the words “vanilla extract” replaced with “vanilla bean paste” you might have to do a double take before you realize that these are quite the same thing.
So what’s the difference between the two?
What is Vanilla Bean Paste?
I often use vanilla extract in my recipes, but I was not familiar with vanilla paste until a couple of weeks ago. The first time I heard and saw vanilla paste was a couple of weeks ago, when my husband brought me a jar of vanilla paste from his sailing trip in Tahiti.
It turns out that vanilla bean paste is delicious! It is much thicker than vanilla extract; it’s actually a like thick syrup. While the taste is probably a bit strong (not to mention expensive) to, for example, pour on your pancakes, but it’s delicious when added to baked goods or pancakes. You can use the paste in place of vanilla extract in any recipe where you want the beans to shine.
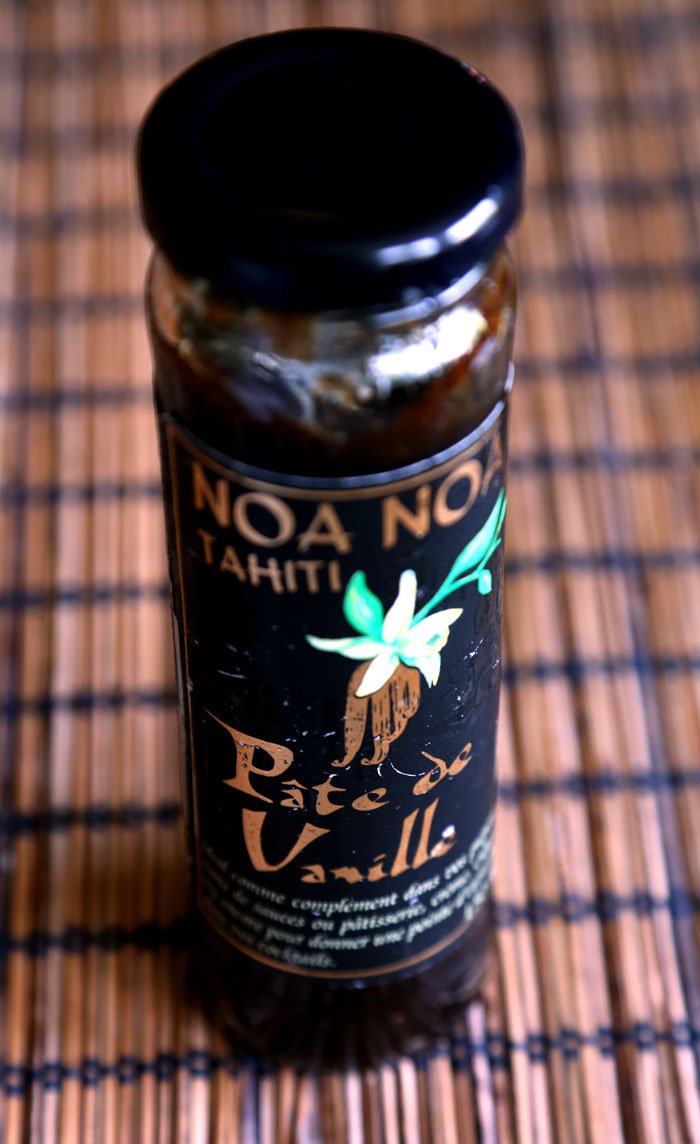
Vanilla extract is made by infusing vanilla into alcohol, which bakes off leaving the vanilla flavor behind. Vanilla bean paste is made by infusing vanilla beans into a thick, sweet syrup made with sugar, water and some sort of thickener. The main distinction is is that the vanilla beans are scraped into the paste, so you get all of those lovely little vanilla bean specks in whatever you’re baking along with the vanilla flavor!
Vanilla bean paste can often be found at specialty stores, and you can find it online easily, as well. It can be used in place of vanilla extract in any recipe. I particularly like to use it in things like banana smoothie with vanilla, vanilla pudding (like this chia seed pudding) and vanilla ice cream.

The Story of Vanilla
There is actually quite an interesting story behind vanilla. It’s one of the few crops that need to be hand-pollinated to produce fruit.
The flowers can be naturally pollinated only by a specific Melipone bee that is only found in Mexico. Thanks to this bee, Mexico enjoyed for a long time a with a monopoly on vanilla production, until a substitute was found for them. The vines would grow, but would not fruit outside of Mexico. Growers tried to bring this bee into other growing locales, to no avail.
The only way to produce fruits without the bees is artificial pollination. And today, even in Mexico, hand pollination is used extensively.
In 1836, botanist Charles François Antoine Morren was drinking coffee on a patio in Papantla (in Veracruz, Mexico) and noticed black bees flying around the vanilla flowers next to his table. He watched their actions closely as they would land and work their way under a flap inside the flower, transferring pollen in the process. Within hours, the flowers closed and several days later, Morren noticed vanilla pods beginning to form. Morren immediately began experimenting with hand pollination. A few years later in 1841, a simple and efficient artificial hand-pollination method was developed by a 12-year-old slave named Edmond Albius on Réunion, a method still used today. Using a beveled sliver of bamboo,[18] an agricultural worker lifts the membrane separating the anther and the stigma, then, using the thumb, transfers the pollinia from the anther to the stigma. The flower, self-pollinated, will then produce a fruit. The vanilla flower lasts about one day, sometimes less, so growers have to inspect their plantations every day for open flowers, a labor-intensive task. (via http://en.wikipedia.org/wiki/Vanilla)
Types of Vanilla
Bourbon vanilla or Bourbon-Madagascar vanilla, produced from V. planifolia plants introduced from the Americas, is the term used for vanilla from Indian Ocean islands such as Madagascar, the Comoros, and Réunion, formerly the Île Bourbon. It is also used to describe the distinctive vanilla flavor derived from V. planifolia grown successfully in tropical countries such as India.
Mexican vanilla, made from the native V. planifolia, is produced in much less quantity and marketed as the vanilla from the land of its origin. Vanilla sold in tourist markets around Mexico is sometimes not actual vanilla extract, but is mixed with an extract of the tonka bean, which contains coumarin. Tonka bean extract smells and tastes like vanilla, but coumarin has been shown to cause liver damage in lab animals and is banned in food in the US by the FDA.
Tahitian vanilla is the name for vanilla from French Polynesia, made with the V. tahitiensis strain. Genetic analysis shows this species is possibly a cultivar from a hybrid-cross of V. planifolia and V. odorata. The species was introduced by French Admiral François Alphonse Hamelin to French Polynesia from the Philippines, where it was introduced from Guatemala by the Manila Galleon trade.
West Indian vanilla is made from the V. pompona strain grown in the Caribbean and Central and South America.
The term French vanilla is often used to designate preparations with a strong vanilla aroma, contain vanilla grains and may also contain eggs (especially egg yolks).
Questions? Comments? Suggestions?
If you have a favorite recipe, why not submit it here in the comment section of this smoothie recipes blog for others to enjoy too!
I also welcome any comments, questions and suggestions. Thanks!
Soups, besides smoothies, are some of my favorite meals to prepare. I’m making them almost every other day, so I can say I learned a few useful tricks to make the process super-easy while keeping the results super-healthy. Here is one example: I’m super excited to have one of my soups featured on CookingQuinoa.net website. Check out my recipe for cream of broccoli soup (with quinoa).
Leek and Potato Soup Recipe
The leek and potato soup that I want to share with you today is among the greatest classics of French homemade soups — an inexpensive, filling, and elegant concoction that is welcome when you’ve been feeling under the otherwise balmy weather.
This modern take on a classic leek and potato soup makes is faster and lighter than traditional potato leek soup – you won’t miss the fat or the extra time!
Some people may find leeks intimidating, but I love their sweet, mellow taste, and use them very often in my cooking, especially in soups. They work great as a more flavorful substitute for onions. The best way to cook leeks is to “sweat” them, which means cooking them with a few tablespoons of water or oil over pretty low heat until they get soft, but not browned.
Note: Make sure to clean the leeks thoroughly before using to avoid a gritty soup. To do that, cut the leek into pieces first, and swirl them in water to remove the grit, then drain them well. Just never pour into a colander because you will pour the heavy dirt over the clean leeks. You may want to do it twice to be sure… like spinach takes 3 washes.
As I don’t like wasting produce, I like to use the whole leeks, white and green parts. I discard only wilted, really tough or damaged outside leaves or top parts.
Ingredients
- 2 onions, chopped
- 2 large leeks, rinsed well and chopped (white and green parts)
- 2 cups spinach or other leafy greens, for deeper green color (optional)
- 4 garlic cloves, chopped
- 2 potatoes (about 2 lbs. total), peeled and chopped
- 4 cups water or vegetable broth
- 2 cups non-dairy milk or cashew cream (or substitute with vegetable stock/water)
- a few sprigs of fresh thyme (about 2 teaspoons of chopped fresh thyme) or 1 tsp. dried
- fresh ground pepper and salt (if using) to taste
Instructions
- Preheat a large, non-stick pot over medium heat. Add onions, leeks and garlic, and sauté in 2-3 tablespoons water or broth on medium-low heat for 5-7 minutes, until onions are translucent.
- Keep the heat low enough that the garlic doesn't brown; you just want everything to sweat. Cover the pot to prevent the liquids from evaporating, and stir frequently to time to keep vegetables from sticking to the bottom and burning.
- Add potatoes, thyme and pepper, and broth and bring to a boil. Reduce heat to maintain a steady simmer and cook until potatoes are very tender, about 20 minutes. Purée soup with a hand-held blender or, working in batches, transfer to a standing blender to puree.
- Add non-dairy milk or cashew cream and gently heat, but do not boil. Season to taste. Serve hot. Makes about 6-8 servings.
3.1
https://greenreset.com/leek-and-potato-soup/
Variations:
- Leeks are essential to this soup; there is no replacement for them in this recipe. You can add a little onion, too, but leeks, potatoes, and stock are basically all you need.
- The leek and potato soup is usually pale in color, so for more vibrant color, I like to add two cups of fresh spinach leaves or one cup of frozen spinach to the soup.
- You may blend the soup until very smooth, or leave it slightly chunky.
- I love using cashew cream in my soups. They make soups super creamy, without the added cholesterol. To make cashew cream, blend a handful of raw cashews with a cup of water in a high speed blender until very smooth, and add to the soup.
- The soup can be poured into containers and frozen.

More Creamy Soup Recipes:
Asparagus Soup Recipe
Cream of Celery Root Soup with Granny Smith Apple
For all my blending recipes I use Vitamix. If you don’t already own a VitaMix, I strongly encourage you to check out what this machine is capable of! For more information about VitaMix you can go directly to the VitaMix website. You may also want to read my post about the Best Blender.
I LOVE my VitaMix and highly recommend investing in one if you are ready to make serious changes to your diet. I have had mine for almost 5 years and use it daily!
If you decide to purchase Vitamix – be sure to use Promotional Code 06-004554 to get free shipping.
The Making of Leek and Potato Soup: Blending in Vitamix
Questions? Comments? Suggestions?
If you have a favorite recipe, why not submit it here in the comment section of this green smoothie and healthy recipes blog for others to enjoy too!
I also welcome any comments, questions and suggestions. Thanks!
One of the biggest factors that may hinder your efforts when trying to lose weight or eat more healthfully is time management.
Mornings in particular seem to be a challenge as this is the time you may feel the most rushed. As you wake up in the morning and continue to push the snooze button for that additional five minutes of sleep you may be sleeping away the most important meal of the day. Instead, you can start your day off right with super food smoothies as a healthy breakfast.
With the right planning, it is really quick and easy to start your day off right with a breakfast smoothie. Simply keep a supply of fresh greens, vegetables and fruits always available, throw those you want each morning in the blender, and enjoy a quick and simple breakfast at home or on your way out the door. You’ll find that mornings start better with a delicious morning smoothie. Here are some tips to make it easier for yourself:
1. Prepare your ingredients in advance. If you know you are going to be in a rush, prepare the ingredients ahead of time. One way to do it is to use resealable plastic bags or containers to keep the exact ingredients for a smoothie. Put 2-4 cups of greens, the fruits of your choice (pre-cut and de-pitted if necessary), as well as veggies; sprinkle with some lemon juice to prevent browning (especially, when using avocado, apples or pears), and add any grains, nuts and seeds that you want, close the container or seal the bag, and place it in your fridge. You can prepare ingredients for a couple of days of smoothies. Then, when the time comes, you’ll only need to take the bag/container out of the fridge, transfer them to your blender, add liquid, blend, and you’re ready to go.
2. Add some superfoods for extra boost. It is a good idea to have a nice handful of a few of your favorite superfoods on hand for when you want to boost your blends. You do not need ALL the superfoods out there, just a few. I think 3-5 is a good number. Here are a few examples: spirulina powder, maca powder, goji berries, cacao powder, cacao nibs, hemp seeds, flax seeds or oil, chia seeds, acai powder, mesquite powder, lucuma powder, wheatgrass powder, superfood blends, green tea powder (matcha) and more. Choose a few and experiment with boosting the nutritional wellness of your blend.
3. Invest in a portable bottle and super-wide straws. This way you’ll be able to take your smoothie with you. You may choose a translucent bottle, or one that conceals the color of your drink.
Breakfast Smoothies to Start Your Day Right
1 peach (pit removed)
1 banana
2 cups spinach (or other leafy greens or sprouts)
1/2 cup water
Blend all ingredients until smooth and creamy.

How about pina-colada-type smoothie for breakfast? This pineapple smoothie will make you smile all day!
1 cup fresh pineapple, cut into pieces, or frozen pineapple chunks
1 cup strawberries, fresh or frozen
1 ripe banana (optional)
2 leaves of spinach or other leafy greens
1 cucumber, peeled and/or 2 stalks of celery
a piece of fresh ginger (optional, it gives the smoothie nice “zing” that I love)
1 cup water (more or less, to desired consistency)

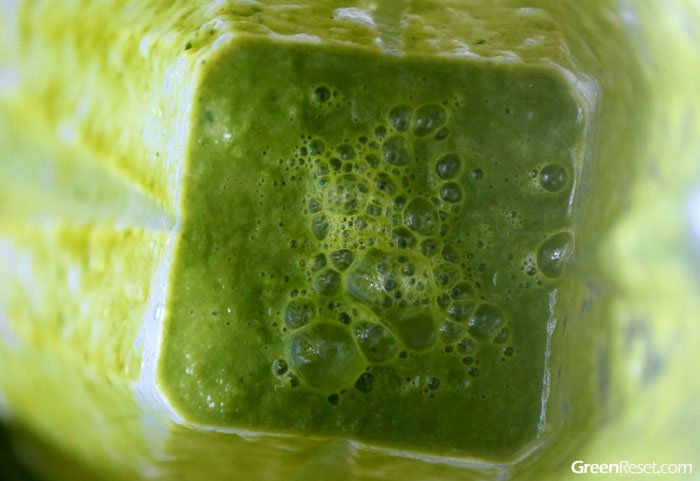
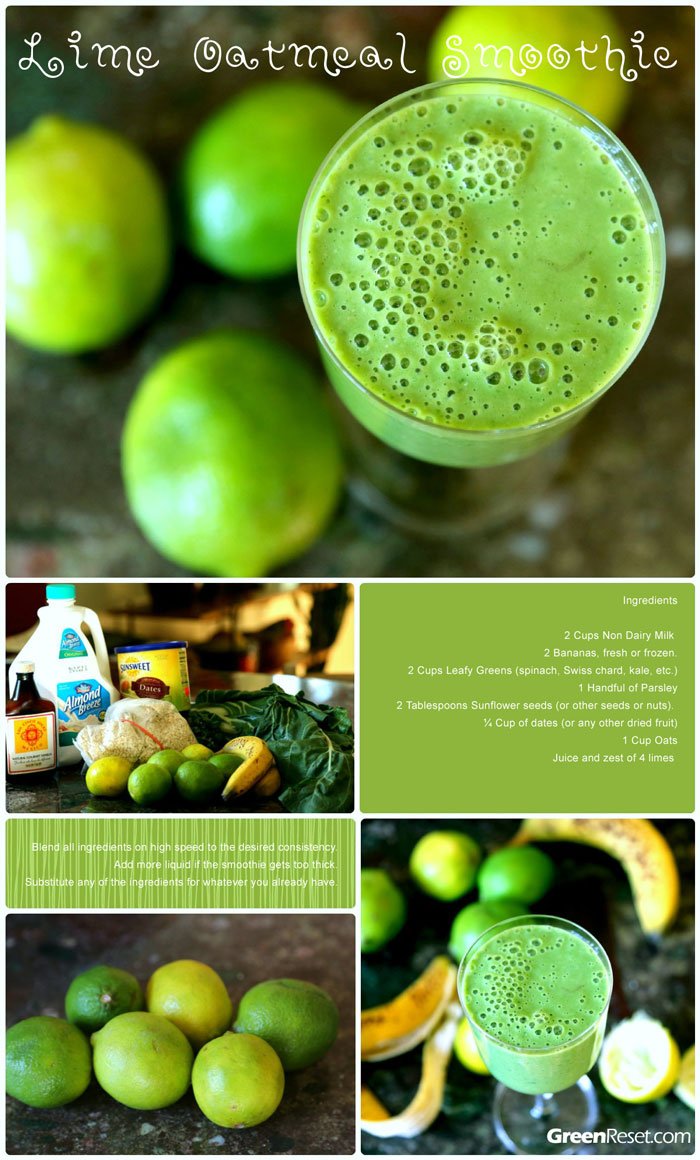
This winning combination of limes and oats creates a smoothie that’s both filling and refreshing.
2 cups non dairy milk (use whatever you like or have in your kitchen: oat, rice, soy, almond, hemp, coconut, etc. )
2 bananas, fresh or frozen.
2 cups leafy greens (spinach, Swiss chard, kale, etc.)
1 handful of parsley
2 tablespoons sunflower seeds (or other seeds or nuts that you have). Pre-soaking your seeds and nuts is recommended, but not required.
¼ cup of dates (or any other dried fruit)
1 cup oats
Juice and zest of 4 limes
1 1/2 cup mixed berries (I use frozen mix of strawberries, raspberries, blueberries and blackberries)
2 or 3 celery stalks
2 bananas (you can use less if you want a less sweet smoothie)
a slice of ginger root (optional, it gives the smoothie a little tangy kick)
1/4 avocado (optional, for more creaminess)
2 cups kale or other leafy greens (optional)
1 cup water (or a little more, depending on how thick or thin you like it)

Spinach-Mango Green Smoothie
1 large banana, ripe
1 cup mangoes
1/2 cup strawberries
5 oz spinach
1 1/2 cups water

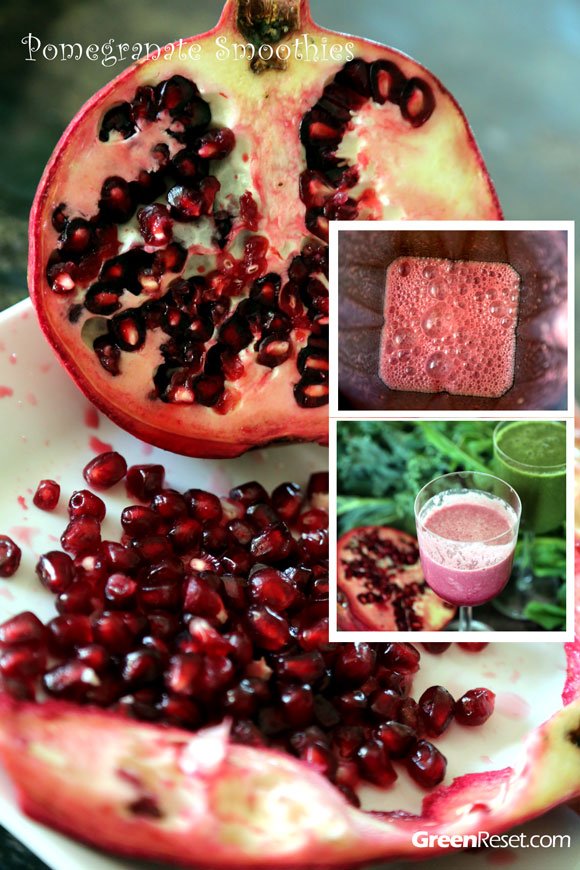
4 cups organic baby spinach or other leafy greens (you may use less if you are just starting up with green smoothies)
1 cup pomegranate seeds or juice
1 cup blueberries, frozen
1 cup strawberries, frozen
3 dates, cut in half (optional)
2 tablespoons flaxseeds, ground
1/2 avocado, optional
1 large orange, peeled or two small tangerines (seedless)
1 cup kale or spinach (or any variety of greens you have- collards, chard, arugula, parsley)
1/2 small avocado
1/2 cup apple, chopped
1 cup coconut water, grapefruit juice or water, chilled
1/2 cup ice or frozen grapes
1/2 banana (optional, adds creaminess)
1 Tbsp lemon juice

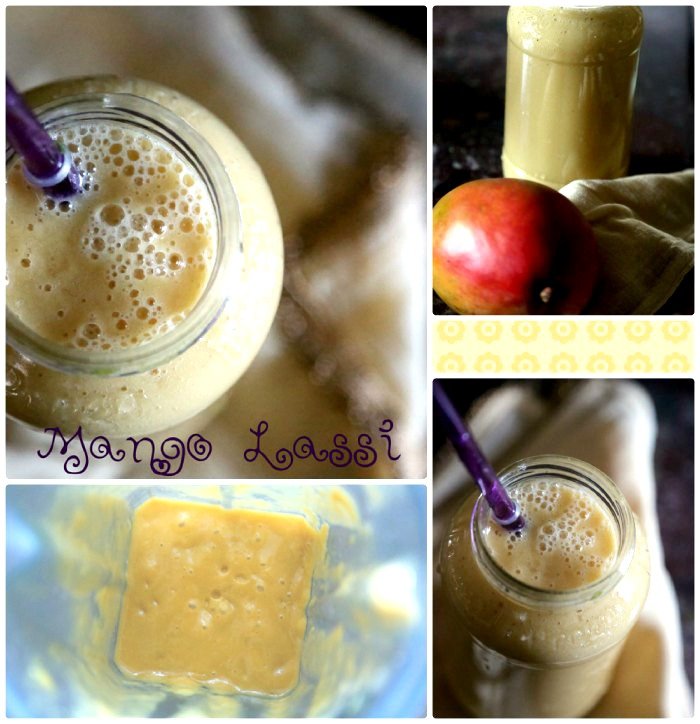
Version #1 with Non-Dairy Milk
2 ripe mangoes, pitted, peeled and roughly chopped, or 2 cups frozen mango chunks
1 cup vanilla non-dairy milk, such as almond, flax, or soy
1 cup light coconut milk
1/2 cup ice cubes (optional)
1/2 teaspoon ground cardamom (optional, to taste)
Version #2 with Cashews
2 ripe mangoes, pitted, peeled and roughly chopped, or 2 cups frozen mango chunks
1/4 cup cashews
2 cups water
4 small dates, pitted
1/2 teaspoon ground cardamom (optional, to taste)
1/2 cup ice cubes (optional)
If using cashews, start by blending them with water until smooth.
Add all ingredients to your blender, and blend until creamy.
You may need to add a bit more water or milk, depending on how thick you want your lassi to be.
Pour into a glass, sip, and smile!
The benefits of a smoothie in the morning include:
- Super nutrition to jump start your day. For many people, breakfast is the most important meal of the day. Not only does a good breakfast provide needed nutrition for your body, it can actually jump start it by increasing your energy level and increasing your metabolism to encourage it to work more effectively. If you are trying to lose weight, not eating breakfast may sabotage your efforts. Although some people do well on little or no food in the morning, for most of us having meal at breakfast time can actually help to encourage weight loss. A super food smoothie in the morning floods your body with essential vitamins, mineral and phytonutrients that will not only satisfy hunger but provide the fuel for your body’s systems to work at their best.
- Super quick and easy to make. With the needed ingredients on hand you simply need to add them to a blender in the morning and within only a few minutes you’ll have a nutritious smoothie full of essential vitamins and minerals as well as full of flavor.
- Smoothies are very portable. Simply pour the smoothie into a travel save mug or container and drink it on your way to work. For those who spend the last minutes of the morning sleeping you’ll find that smoothies are a great way to reclaim breakfast.
- Smoothies fill you up. Because super food smoothies have high quality ingredients you will find that beginning your morning with one will make you feel fuller longer. You’ll be providing your body with all of the nutrients it needs to have the energy to make it through the morning.
Other Healthy Breakfast Ideas
If you are still hungry after your smoothie, or would like something different than a blended drink, here are some other healthy choices for breakfast:
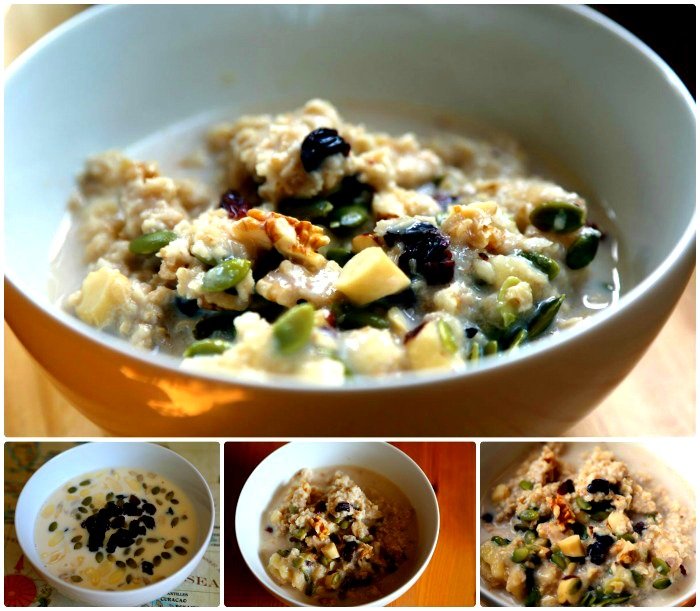
Oatmeal is one of the easiest breakfasts to prepare. It’s also one of the cheapest and healthiest (find out more about health benefits of oatmeal here). I like to use the quick-one-minute rolled oats for a quick, no-cooking-required healthy breakfast. I soak them for a few minutes in almond or soy milk, and toss in some dried fruit, nuts and seeds for even more nutritional benefits.
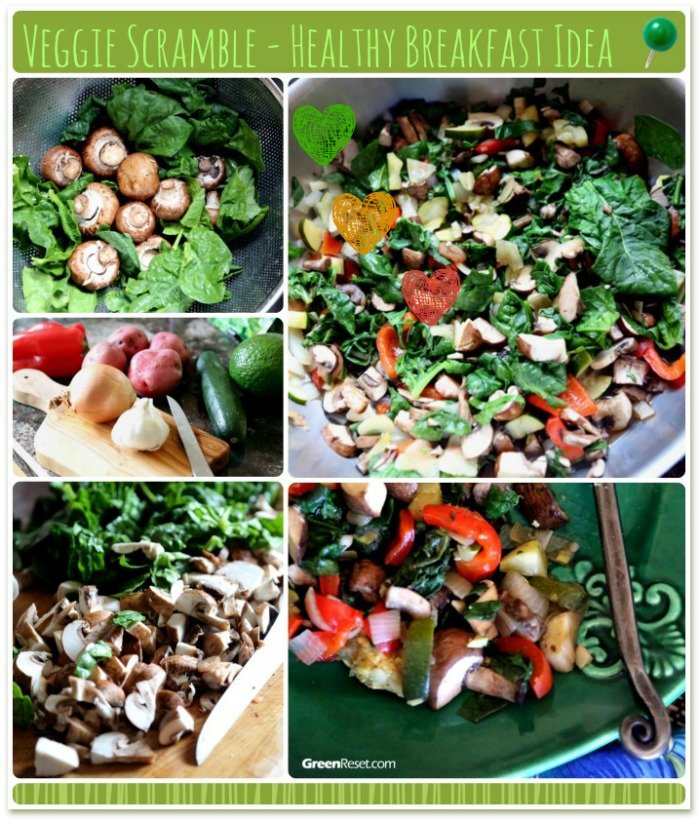
This may not seem like a quick breakfast idea, but it can be – if you prep your veggies in advance. Whenever you are not in a hurry, e.g., when you are cutting vegetables for a soup for dinner, cut some extra veggies and save them in a container in your fridge for later. Then, in the morning, simply heat a thick bottomed pan, add the veggies with a few tablespoons of water, some spices (I like to add a french herb mix – which contains majoram, thyme, and other herbs, as well as some cumin, and tamari sauce), and saute the vegetables for a few minutes. You can even leave them on the stove – on low heat, covered keep water from evaporating and prevent burning, while you are getting dressed.
Here is the recipe for a veggie-tofu scamble. You can skip tofu and simply sautee vegetables, such as onions, mushrooms, zucchini, peppers, tomatoes, spinach and other.
Egg Free Pancake Recipe

Egg-Free Pancake Recipe
For all my blending recipes I use Vitamix. If you don’t already own a VitaMix, I strongly encourage you to check out what this machine is capable of! For more information about VitaMix you can go directly to the VitaMix website. You may also want to read my post about the Best Blender.
I LOVE my VitaMix and highly recommend investing in one if you are ready to make serious changes to your diet. I have had mine for almost 5 years and use it daily!
If you decide to purchase Vitamix – be sure to use Promotional Code 06-004554 to get free shipping.
Blending in Vitamix
Questions? Comments? Suggestions?
If you have a favorite recipe, why not submit it here in the comment section of this green smoothie and healthy recipes blog for others to enjoy too!
I also welcome any comments, questions and suggestions. Thanks!
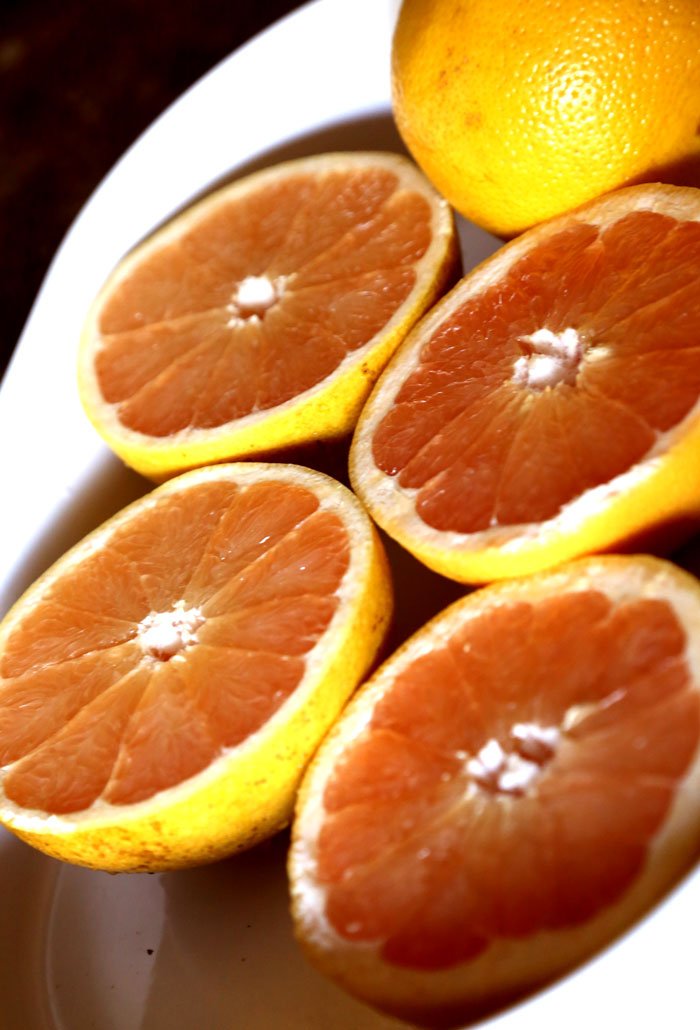
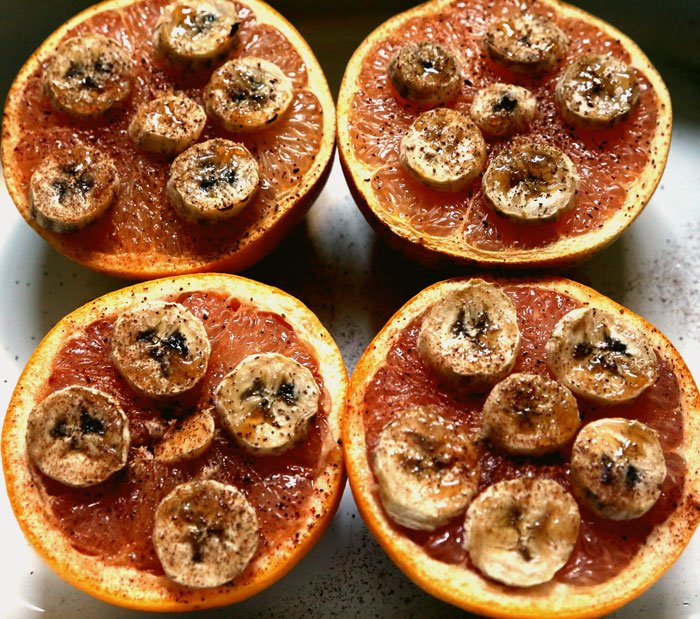
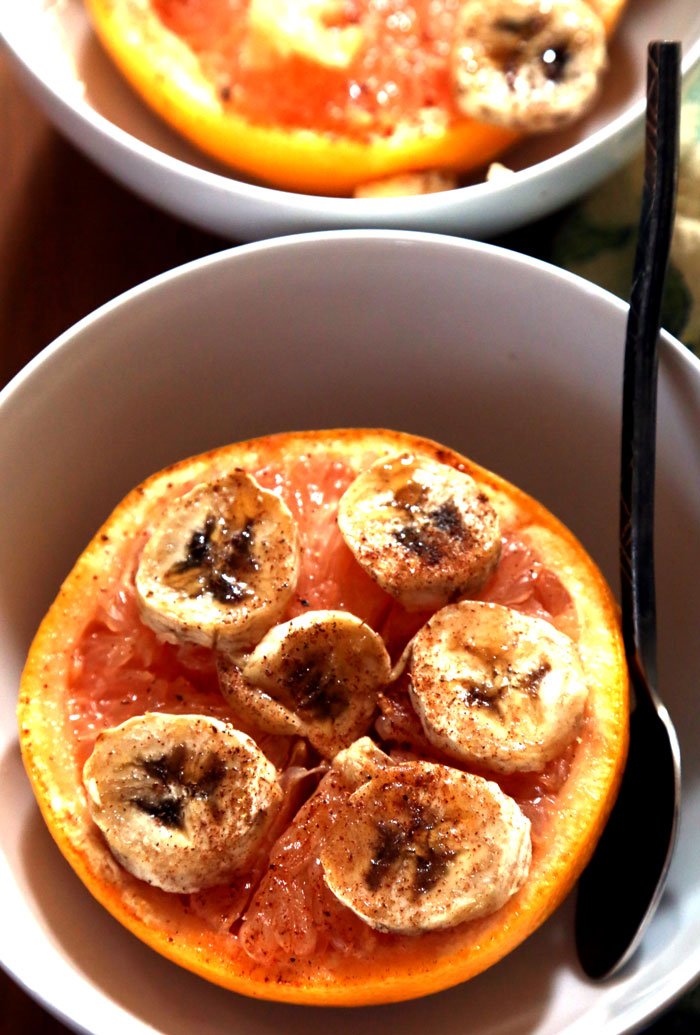
Have you ever tried broiled grapefruit? I have a few days ago.
Up until recently, I’d just cut it and eat it straight from the bowl. Turns out, broiled grapefruit is delightful!
Broiling brings out the sweetness and tampers the acidity of the grapefruit. It’s a wonderfully sweet and delectable addition to any meal or dessert.
It can easily be modified to use many different fruits such as peaches, apricots, or pineapple.
I strongly suggest cutting sections prior to broiling. Otherwise, you’ll have a very sticky mess on your hands!
Broiled Grapefruit Recipe
Broiled Grapefruit: Easy Dessert Recipe
Ingredients
- 2 grapefruit, cut in half
- 1 banana or other sweet fruit (optional)
- 2 teaspoons (or to taste) brown sugar (stevia or agave syrup will work too)
- a dash of cinnamon (pumpkin spice, nutmeg, or ginger powder)
Instructions
- Preheat your oven's broiler.
- Cut the grapefruits in half and place them cut sides up, onto a baking sheet. Use a small serrated knife to cut out the sections in the halves.
- Slice banana and place the slices on top of the grapefruit halves.
- Sprinkle brown sugar over grapefruit sections, using more or less as desired.
- Broil for 4 to 6 minutes, until sugar is starting to turn brown.
- Let cool for a few minutes before eating warm.
3.1
https://greenreset.com/broiled-grapefruit-easy-dessert-recipe/
To make it easy to eat the grapefruit, use a serrated knife to slice the segments and then all around the outside (see instructions here). It will make it easier to eat. They also make grapefruit spoons.
If you aren’t into adding sweetener, then just broil the grapefruits without any sugar. If you’re OK with adding a little sweetener, then use whatever you have in your pantry – regular sugar, brown sugar, agave or maple syrup, or stevia.

These would be a great dessert to impress your guests – even at those who come unexpectedly – because they look pretty and take under under 10 minutes to prepare.


Just like regular grapefruits, these are great anytime – breakfast, lunch, dinner, snack, dessert.
I’d never think about broiling a grapefruit, until I found this inspiration. When I saw the amazing pictures on that site, I knew I had to try it.
Questions? Comments? Suggestions?
If you have a favorite recipe, why not submit it here in the comment section of this smoothie recipes blog for others to enjoy too!
I also welcome any comments, questions and suggestions. Thanks!
(Guest Post)Whether you are planning a dinner party, or just want to make a special dessert for a family dinner, these recipes are sure to please. The ingredients are wholesome and keep it healthy, but the are still delicious. Dessert is a great way to round out a meal and gives everyone a special sweet treat to look forward to. The following recipes are sure to become guilt-free, animal-product-free, favorites. Those recipes included are also very versatile, they can be packed in lunches for a midday treat or served at your next summer barbecue…everyone needs to have at least a couple sweet recipes that can be made when time is short.
Caramel Bananas
This recipe is from the blog Uncooking 101, and is so ridiculously easy that you could let the kids make it for you. They would even be great served alongside a scoop of raw vegan ice cream. The ingredients list is really short, consisting of:
- 3 raw bananas
- 1/2 cup cashews that are nice and dry; and
- 2 tbsp of coconut crystals
On the blog there are detailed instructions, not to mention some great pictures as to how to assemble these impressively delicious treats that are going to be sure to please. The gist of it is that the bananas are cut into lengthwise pieces, that are halved, and then sprinkled with a crumbly mixture of the coconut crystals and cashews. Something this simple is exactly what you need when there are unexpected guests–Oh, and they are raw vegan as well!
Mmmm Cookie Dough Balls!
Over on the blog Averie Cooks, there resides a recipe that will please vegan, non vegans and raw foodists–even picky children. There can’t possibly be a person on this earth who doesn’t love cookie dough. This cookie dough is a million times better, in taste and health wise. The ingredients for these tasty, no bake morsels are:
- 2/3 cup raw cashews
- 1/3 cup rolled oats
- 2 tablespoons agave nectar
- 1 tablespoon maple syrup
- 1 teaspoon vanilla extract
- 1/4 cup chocolate chips
The ingredients list above is not truly raw, if that is a concern for you the actual post tells you how it can be adjusted to be a real raw recipe. Once you have all the ingredients the mixing can all be done mechanically with a high powered blender or food processor. Then all that is left to be done is roll it into balls–or just eat it with a spoon!
Lemon and Coconut–Oh my!
If you love light , melt in your mouth types of cookies, then this is the perfect recipe for you. To make these sweet treats from the blog Addicted to Veggies you will need:
- 1 ½ cups almond flour
- 1 ½ cups dry shredded unsweetened coconut
- 1/3 cup coconut flour
- 2 pinches salt
- 6 tablespoon agave nectar
- 4 tablespoons lemon juice
- 2 teaspoons vanilla
- 1 tablespoon lemon zest
The rest is simple, mix the wet, mix the dry, and then mix them both together. To finish the cookies there are a few options which are well detailed in the original post. You can choose to put them in a dehydrator, or chill them before serving. Whichever method you choose, they will both provide excellent results.
The three recipes above are great for the summer because they don’t involve cooking, but they are also good for the winter when comfort food abounds and the call to consume some, maybe, less than healthy foods beckons you. The saying guilt-free treats truly applies to these, and you should be able to master them whether you are a Nigella, or a kitchen newbie.
This article is a guest contribution by Georgia Webster. Georgia is a vegan who loves sharing the great recipes that she has found and enjoyed.


