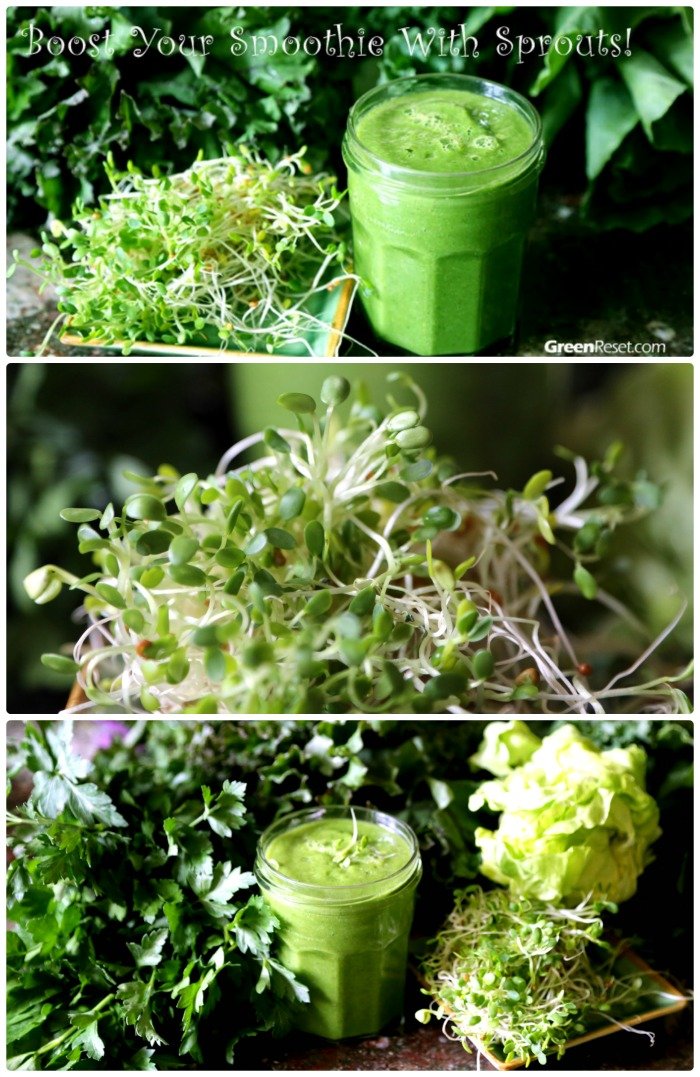
Even though I’ve known about the nutritional benefits of sprouting for quite some time, I’ve only recently started experimenting with growing my own sprouts and adding them to green smoothie recipes and other dishes. So, from now on, I’m determined to not just include more sprouts in my diet, but to learn how to grow them, and start a mini-sprout garden in my kitchen.
Really, when you think about it, it’s probably the most local, freshest, most nutritious food that you can get, especially in the winter. And even in other times of the year – not everyone has a garden – but you can have sprouts growing in your kitchen all year long.
Plus, sprouts are considered a SUPER FOOD – they are probably the most nutrient dense of all foods, while being incredibly affordable and easy to grow.
Sprouts can provide you with a steady year-round source of vitamins, minerals, trace minerals, enzymes, antioxidants, chlorophyll and protein, as well as a high concentration of health and youth-supporting enzymes.
To boot, they are low calorie and contain little or no fat. The fat they do contain is the healthy fat that your body needs. As some of the most nutritious foods that exist, they make a great addition to any healthy eating plan.
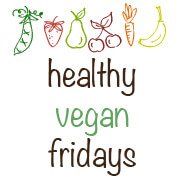
You can have them fresh all year round, even when fresh vegetables are hard to find. It’s easier than planting a garden outside and they’re ready much quicker. And the best part is that you can grow fresh sprouts right in the comfort of your own kitchen. It takes less than 2 minutes a day and they are ready in 3 to 7 days, depending on the variety. You can sprout seeds, beans, grains and nuts. Some of the most popular varieties are alfalfa, broccoli, red clover, radish, mung beans, lentils, garbanzo beans and peas.
So What Are the Health Benefits of Sprouts?
The essential requirement for health and healthy weight loss is a diet that is high in nutrients and low in calories.
Doctor Fuhrman calls it a Nutritarian diet. (You shouldn’t really be thinking of it as a diet in a sense that you do it for a few weeks and then go back to your old ways. It should become your lifestyle.)
Problem is many of the foods we buy at the supermarkets today are not as fresh and nutrient rich as we believe. Many items have to travel across the country (or across the world) to get to where we live. They have to be treated with various life-extending substances and procedures.
And buying supplements can get very costly.
Obviously the best solution would be to grow your own food, but that’s not for everyone…
Sprouting is something that anyone can do that is easy to do and will provide tremendous benefits to your health, helping you lose weight, reverse disease, increase energy, or whatever your goal.
Apparently, sprouting magnifies the nutritional value of the seed and makes the nutrition more bio-available to the body. It boosts the B-vitamin content, triples the amount of vitamin A and increases vitamin C by a factor of 5 to 6 times. Starches are converted to simple sugars, making sprouts very easily digestible.
Have you heard about the Hippocrates diet? In the renowned Hippocrates Institute, where they regularly cure terminally ill people using only nutrition and other lifestyle modifications, sprouts are one of the key ingredients on their menu.
Sprout Smoothie Recipe
Sprouts are really versatile. You can use them in smoothies, blended soups and salads, as well as regular salads, on sandwiches, stir fried with vegetables, or enjoy these nutrient-packed delicacies as a snack all by themselves or added as a garnish to a main dish.
To make a smoothie, add about 1/4 to 1/2 cup of sprouts to any smoothie recipe. Don’t put too many sprouts in your smoothie, and it will take on an overwhelmingly grassy flavor. Used in moderation, however, and sprouts are an absolute delight.
You can grown them yourself (see the instructions below), or simply buy them in a grocery store (that’s what I did for this recipe). If you don’t like the effort that growing your own sprouts takes, many health stores and farmers market have sprouts – but the selection may not be impressive and it will cost much more than if you grown them yourself.
Green Smoothie with Sprouts
Ingredients
- 1/4 cup alfalfa sprouts
- 1 cup baby spinach
- 1 cup pineapple, frozen
- 1/2 banana, frozen
- 1 cup water
- 1/4″ – 1/2″ fresh ginger, minced
- 1/16 teaspoon of Stevia (or agave nectar)
- 1-2 ice cubes, to thicken
Instructions
- Blend ingredients in a powerful blender until smooth and creamy. Thin with water or thicken with ice if desired. Enjoy!
How to Grow Your Own Sprouts
Sprouts are easy to grow and take a minimum of effort. You probably already have everything you need to start your own kitchen garden. Once you’ve gone through the process once or twice, it will become easy.
To grow sprouts in jars on your kitchen sink, you will need:
- a wide-mouth jar
- screen or netting
- a rubber band
- a bowl to drain the jar
- fresh water
- sprouting seeds
Choose organic sprouting seeds whenever possible. The problem is that seeds that are not specifically sprouting seeds and not organic may be chemically treated with pesticides.
You’ll find lots of sprouting supplies and books on Amazon.
Two ounces of seeds will yield 1-2 pounds of sprouts, and 8 ounces of beans will yield 1 pound of sprouts.
Your sprouts will grow best when the temperature is between 65F and 75F (18C and 25C).
- Put 1 to 2 tablespoons of seeds or 3 to 4 tablespoons of beans in a wide mouth jar.
- Cover with netting or cheesecloth and secure with a rubber band.
- Rinse a couple times, then fill the jar 3/4 full with pure water, room temperature, and soak 6-8 hours or overnight.
- Drain soak water. Rinse 2 or 3 times in cool water.
- Invert jar and prop at angle in sink or bowl to drain.
- Rinse 2 or 3 times twice a day in cool water.
- Place sprouting jar in bright light, but not direct sunlight, last sprouting day to allow chlorophyll to form.
- Sprouts will grow three to seven days. Seed sprouts, like alfalfa or red clover are 1″ (2.5 cm) to 2″ (5 cm) long when ready. Bean sprouts, like lentils or peas are 1/4″ (.5 cm) to 1/2″ (1 cm) long when ready. These are more tender when small. Mung beans are 1″ (2.5 cm) to 2″ (5 cm) long when ready. They are best grown in the dark to prevent bitterness. They should be rinsed 3-4 times a day. Taste the sprouts as they are growing to see when you like them best.
- Drain well. Cover the jar with a lid, or transfer to a covered container. Refrigerate to store.
Soaking times and amounts of seeds for sprouting in a quart jar:
- Alfalfa seeds: 4 to 8 hours
- Clover seeds: 4 to 8 hours
- Broccoli seeds: 8 to 12 hours
- Whole lentils: 8 to 12 hours, then eat
- Fenugreek seeds: 4 to 8 hours
- Radish seeds: 4 to 8 hours
- Raw hulled sunflower seeds: 6 to 8 hours, then eat
- Chia seeds: 6 to 8 hours, then eat
- Sesame seeds: 6 to 8 hours, then eat
- Wheat berries: 8 to 12 hours
- Rye berries: 8 to 12 hours
More Great Ways to User Sprouts
Once you get your sprout garden going, you can use the sprouts in a variety of ways, not just in smoothies.
- Add to tossed salads
- Use in coleslaw (cabbage, clover, radish)
- Add to potato salad (mung bean, lentil)
- Use in wraps and roll-ups (alfalfa, sunflower, radish)
- Stir-fry with other vegetables (alfalfa, clover, radish, mung bean, lentil)
- Replace celery in sandwich spreads (lentil, radish)
- Grind up and use in sandwich spreads (lentil, radish)
- Stir into soups or stews when serving (mung bean, lentil)
- Mix into pancake or waffle batter (buckwheat)
- Eat them fresh and uncooked in a sprout salad (salad mixes)
- Combine in rice dishes (fenugreek, lentil, mung bean)
- Add to vegetable sushi (radish, sunflower)
- Saute with onions (mung bean, clover, radish)
- Puree with peas or beans (mung bean, lentil)
- Add to baked beans (lentil)
- Steam and serve with butter (mung bean, lentil)
- Use in sandwiches instead of lettuce (alfalfa, clover, radish)
P.S. There have been some articles in the press about sprouts not being a safe food to eat. Read my article about the safety of sprouts.
Questions? Comments? Suggestions?
If you have a favorite recipe, why not submit it here in the comment section of this smoothie recipes blog for others to enjoy too!
I also welcome any comments, questions and suggestions. Thanks!
Chocolate mousse is a great dessert that doesn’t take a long time to prepare (this version, literally takes less than 5 minutes). Plus it’s great for entertaining because 1) it looks pretty, 2) it’s delicious, and 3) you can make it ahead of time.
The recipe that I’m about to share with you has to be one of the easiest and most satisfying desserts around.
How to make the easiest ever chocolate mousse
This Creamy Chocolate Avocado Mousse is rich and decadent. Silky texture and deep chocolate flavor in every spoonful. And you won’t believe how easy it is to make, with just two base ingredients, plus a few optional to be added as you wish.

Now, when most people think of avocado, a sweet desert will most likely be the last dish to spring to my mind.
So, if you are skeptical about putting avocados and chocolate together, it’s understandable. However, no worries! One spoonful and you will understand why many people rave about chocolate avocado mousse recipes.
When I made this recipe and dressed it up for the picture, my son wanted to try it immediately. After he did, he said: “You made this? You should be working in a restaurant!” :-).

As I said, avocado-based mousse is guilt-free because because it only contains healthy ingredients.
However, it doesn’t mean it’s calorie-free or fat-free, since avocados are quite high in calories and fat (I said guilt-free, not calorie-free ;-)).
Easiest Ever Chocolate Mousse Recipe
Easiest Ever Chocolate Mousse
Ingredients
- 1 large avocado (3/4 - 1 cup mashed)
- 1/4 - 1/3 cup vegan hot cocoa mix (sweetened)
-
Optionally add:
- a pinch of salt
- a few drops of vanilla extract
-
You may keep it super simple and just serve the mousse as is. Or build a mousse parfait!
Here are your optional ingredients:
-
- dark chocolate chips or chocolate shavings
- shredded coconut
- pecans, walnuts, or other nuts, chopped or whole
- freshly grated orange zest
- cinnamon or nutmeg
- sliced banana
- sliced strawberries
- whole blueberries or other berries
- crushed vegan cookies or grahams
- brown sugar
- drizzle of agave or maple syrup
- cashew cream, soy or coconut whip on top
Instructions
- Mash up avocado with hot cocoa mix. Process in a food processor until smooth with a pinch of salt and a few drops of vanilla.
- Serve in pretty glass containers decorated with slices of banana, chocolate chips, coconut flakes, or whatever else you have in your pantry!
3.1
https://greenreset.com/chocolate-mousse/

I hope you enjoy it as much as we did!
Try it on Sunday, Monday, Thursday or Friday :-). (Or any other day, really). It’s completely up to you!
Now, there are people who insist that avocados have no place in the dessert; they claim that they can still taste it no matter how much chocolate and other ingredients they add, and that this is not acceptable. If that’s you, I have another version of chocolate mousse recipe, with another surprise ingredient….
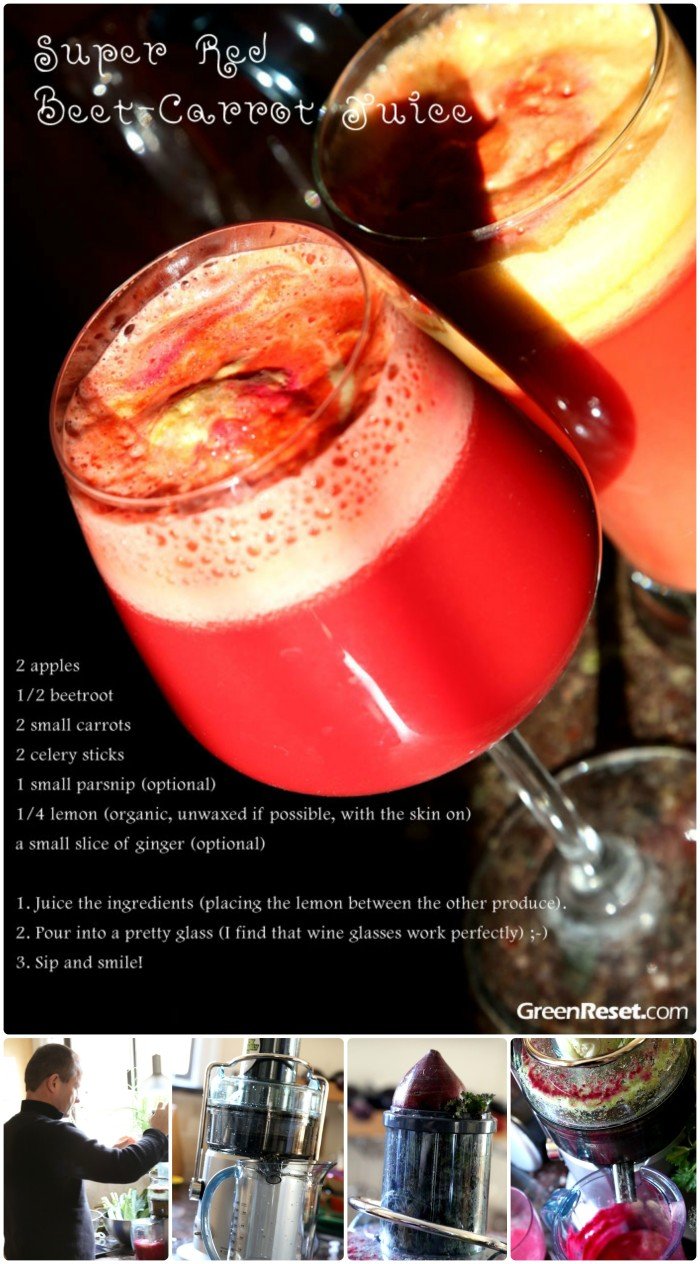
After long winter (and gallons and gallons of green smoothies), I’m craving juices. Today, I’ve made some green juice – just looking at it makes you feel energized!
Green juice packed with vegetables is all the rage these days. It can be prepared with a variety of ingredients, such as kale, celery, broccoli, cabbage, cucumber, apple, kiwi, parsley and/or cilantro.
Juicing kale, broccoli, celery or parsley adds that green color and a multitude of health benefits. Throw in a sweet element to keep the juice palatable, but going too sweet may result in a dessert juice rather than a drinkable vitamin.
For beginners, I’d advise to steer clear of adding too much cabbage, cilantro or parsley (only because you may find the flavors too strong), and add more cucumbers, apples, a pear or a kiwi – to make it sweeter.
Green Juice Recipes
So, if you are willing to try a great juicing recipe for green vegetables and kale that will give you lots of energy, here it is.
Basic version:
4-5 celery sticks
5-6 leaves of kale (or other leafy greens)
1-2 apples or pears (green apples are less sweet, more tart)
1 lemon (if not organic, then the lemon should be peeled)
Additional/optional ingredients:
1 cucumber
1/4 of a small cabbage
1/4 to 1/2 ripe papaya (1/2 results in a sweeter juice)
1 handful of parsley or cilantro
1 thumb-sized nob of ginger
You may also like to add some beets or carrots, but then of course it will no longer be a green juice. Some people like to add small slice of garlic and/or ginger.
Drink to your health and boost your immune system!
Other Juice Recipes to Try
Super Red Beta Carrot Juice

Questions? Comments? Suggestions?
If you have a favorite recipe, why not submit it here in the comment section of this smoothie recipes blog for others to enjoy too!
I also welcome any comments, questions and suggestions. Thanks!
Should I blend or should I juice? – that seems to be the question recently…
Sometimes it’s tough to decide 😉
It’s been a while since I purchased my new Breville juicer to join my kitchen appliance team (and replace the old one, which was long-ago ready to leave its post), and we continue our mini Juice Reboot morning routine (or mini-detox-cleanse) with my husband (who is the main reason I bought the juicer in the first place, as I could not get him to drink enough smoothies, and I think may be more inclined to drink juices).
I have to say it’s been working really well so far, even though it does make the mornings a bit more busy and it takes a bit more time to get everyone out of the house. We’ll continue it for just a couple of days more, until my husband leaves on a trip, and then resume when he comes back in almost three weeks.
So today, we made this rich vibrant beetroot juice with carrots, celery and apple.
I also found a recipe that uses parsnips – which I have to say – I never juiced before. I didn’t have parsnips, so I’ll try it next time and let you know how it tastes. What I can tell you right now, that the combination below (without parsnip), creates a truly delicious nutrient packed juice.
Super Red Beta-Carrot Juice Recipe
Super Red Beta-Carrot Juice
Ingredients
- 1 apple (or use two for a sweeter juice)
- 1 beetroot
- 2 small carrots
- 2 celery sticks
- 1 small parsnip (optional)
- 1/4 lemon (organic, unwaxed if possible, with the skin on)
- a small slice of ginger (optional)
Instructions
- Juice the apples, beetroot, carrots, celery, parsnip and lemon (pack the lemon between the other produce).
- Pour into a pretty glass (I find that wine glasses work perfectly), sip and smile!
3.1
https://greenreset.com/super-red-beta-carrot-juice/
Despite some of the ‘earthy’ ingredients, the apple, beetroot and carrots actually have a sweet flavor, which work together to create a delicious juice. Ginger and lemon will give this juice a nice tangy kick.
The use of carrots in the fight against cancer has been well-documented due to their high beta carotene content and the presence of the natural fungicide falcarinol. Beetroot is a great source of iron, which means it helps purify the blood. This juice is superb for helping to build the blood and is great for fighting infections – juice just what the doctor ordered!
Questions? Comments? Suggestions?
If you have a favorite recipe, why not submit it here in the comment section of this smoothie recipes blog for others to enjoy too!
I also welcome any comments, questions and suggestions. Thanks!
Eating fish may be a considered by many a vast improvement over the Standard American diet (SAD), but most people fail to realize that the consumption of aquatic animals comes with its own set of issues.
Truth is the promise of fish-eating being healthier, more sustainable, better for the environment and more ethical than the consumption of land animals is nothing more than a “fishy” propaganda.
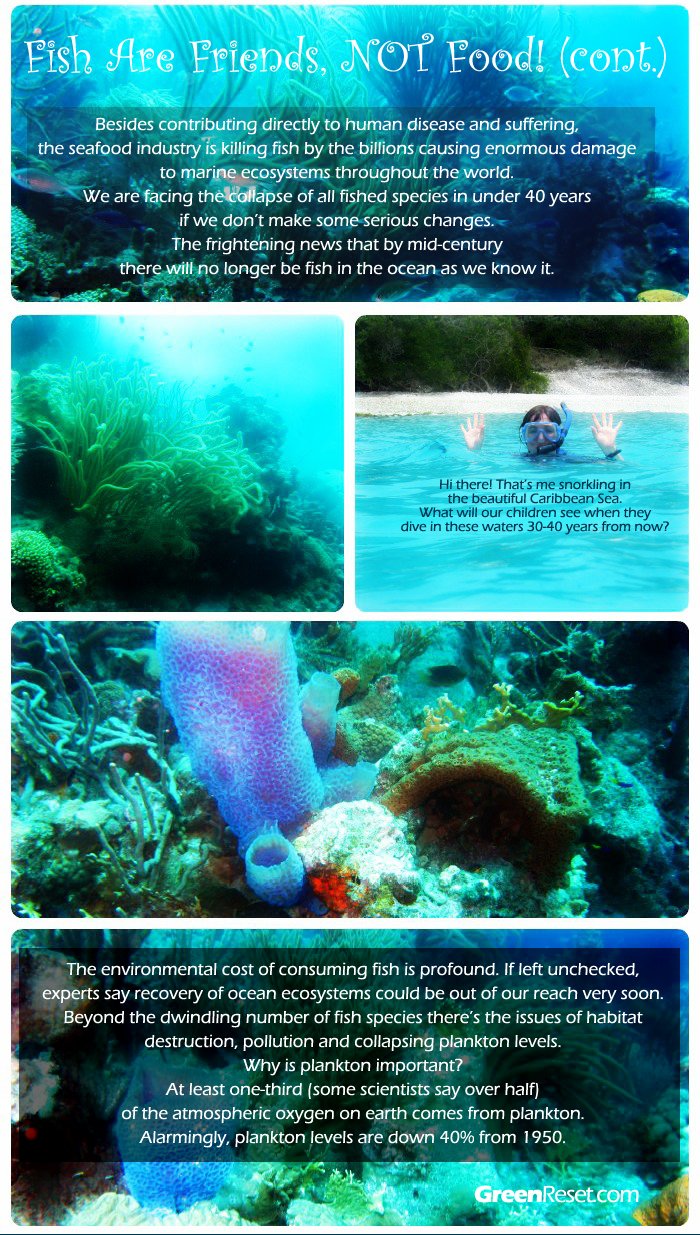
Besides contributing directly to human disease through the toxicity of its products, the seafood industry is killing fish by the billions causing enormous damage to marine ecosystems throughout the world.
We are facing the collapse of all fished species in under 40 years if we don’t make some serious changes. The frightening news that by mid-century there will no longer be fish in the ocean as we know it.
Since the mid-1980s, the international fishing industry’s capacity has increased every year, and yet over the same period, the amount of fish actually caught and killed for food has decreased every year.
The reason is obvious: we have overfished the oceans to such an extreme extent that we have forced all the world’s fisheries into collapse or near collapse. Overfishing of large fish like tuna, cod, swordfish, and salmon, as well as mid-sized fish and small sea animals like shrimp and krill, is having devastating consequences on marine ecology, and driving many aquatic animals into extinction and near-extinction.
What about “Sustainable” Fisheries? Is “Sustainable Fishing” an Answer?
Over the past few years, “sustainable fishing” has become a buzzword and the fishing industry.
While it may be considered a step in the right direction in terms of rectifying the damage to marine ecosystems, it’s hardly a solution to the problem. The question remains: Can “sustainable fishing” exist for a population of over seven billion people?
Considering that the global fishing intake is estimated to be 2.5 times what fish populations could feasibly support, it’s obvious the only truly sustainable way to buy seafood is not to buy it at all.
No large-scale fishing operation can truly be “environmentally friendly.” They put profit above the health of our oceans. Besides, the “smart seafood” diet, also has its limitations. It is tricky to figure out how your fish has been caught; and it’s just difficult to follow this type of selective eating. It has the potential of transforming a person into an irritating dinner guest, along the lines of “Yes, dear hosts, I do love salmon – but only wild Alaskan salmon, please, because I don’t eat other types.”
It is so much simpler to cut fish out altogether. You may be surprised, but people who make that choice feel no particular deprivation. The black and white, yes-or-no categories can make things a great deal easier. And much more sustainable.
Read The Whole Ebook: Truth About Eating Fish and Fish Oil
You may be rolling your eyes at another “truth” being exposed, but I challenge you to read my new ebook and tell me you did not learn something new.

Download the ebook on Amazon (coming soon)
“Exposed: The Truth About Eating Fish What Your Doctor Never Told You About Eating Fish & Fish Oil Supplements”
Questions? Comments? Suggestions?
If you have a favorite recipe, why not submit it here in the comment section of this smoothie recipes blog for others to enjoy too!
I also welcome any comments, questions and suggestions. Thanks!
