This soup is so easy to do, that it literally can take you under 20 minutes from start to finish. It’s also low in calories and super healthy, as it gets its creamy texture from the addition of potato, not cream or butter.
If you’d like to make it even more nutrient dense, you may substitute potatoes with cooked white beans. For a flavor boost, drizzle in some cashew cream, or a squeeze of lemon.
Cream of Broccoli Soup Recipe
Cream of Broccoli Soup Recipe
Ingredients
- 4 cups broccoli (fresh or frozen)
- 1 onion, chopped
- 4 cups vegetable stock or water
- 1 russet potato, peeled, cut into 1” pieces
- Salt and freshly ground black pepper
Instructions
- I often make the soup with frozen broccoli. If using fresh broccoli, remove and discard tough lower stalk of each broccoli, and peel remaining stalk. Finely chop stalk and florets (you should have about 4 cups).
- Heat a few spoonfuls of water in a heavy pot over medium heat. Add onion and sweat until soft and translucent, about 10 minutes. Add water or vegetable stock and potato and bring to a boil. Stir in chopped florets. Simmer until potato and broccoli are very tender, about 10-15 minutes.
- Remove soup from heat and purée in a blender until smooth (you may want to save a few florets for decoration). Season to taste with salt and pepper. Serve hot with crusty bread.
3.1
https://greenreset.com/cream-of-broccoli-soup/


Variations:
Add white beans instead of potato for more nutrient dense soup.
Add cashew cream for more creamy texture (replaces heavy cream).
Add 2 cups of spinach for even more nutrient power.
Calories in Cream of Broccoli Soup:
4 cups of broccoli (364g): 124 calories
1 large onion (150g) = 60 calories
1 medium potato (213g) = 164 calories
Total calories: 348 calories/4 servings= 87 calories per serving
Optional ingredients:
1 cup white beans (180g): 254 calories
1 ounce cashews (28g): 155 calories, 103 calories from fat, contains 2 grams saturated fat
Total calories: 757 calories /4 servings = 190 calories per serving
Total Calories: (without cashews) 228/6=38 calories; with cashews: 528 calories total /6 servings = 88 calories per serving.
As you see, the bulk of the calories (and fat) in this soup comes from cashews. If you’d like to reduce calories even further, while adding more protein to the soup, add 1 cup cooked white beans or chickpeas (garbanzo beans) to the soup.
1 cup garbanzo beans has 269 calories, but only 36 calories from fat. It also contains a whopping 15 grams protein. Chickpeas are also an excellent source of Dietary Fiber, Protein and Copper, as well as Folate and Manganese.
The Secret to Creamy Soup Without Dairy or Wheat
Most conventional creamy soup recipes call for heavy cream, half-and-half, butter and/or flour. Since I learned about cashew cream, it became my method of choice to prepare creamy soups.
To make cashew cream, add 1 cup liquid and cashews to your blender, and blend on high for 30 seconds, until very smooth. Pour into the pot with the soup and simmer for a few more minutes.
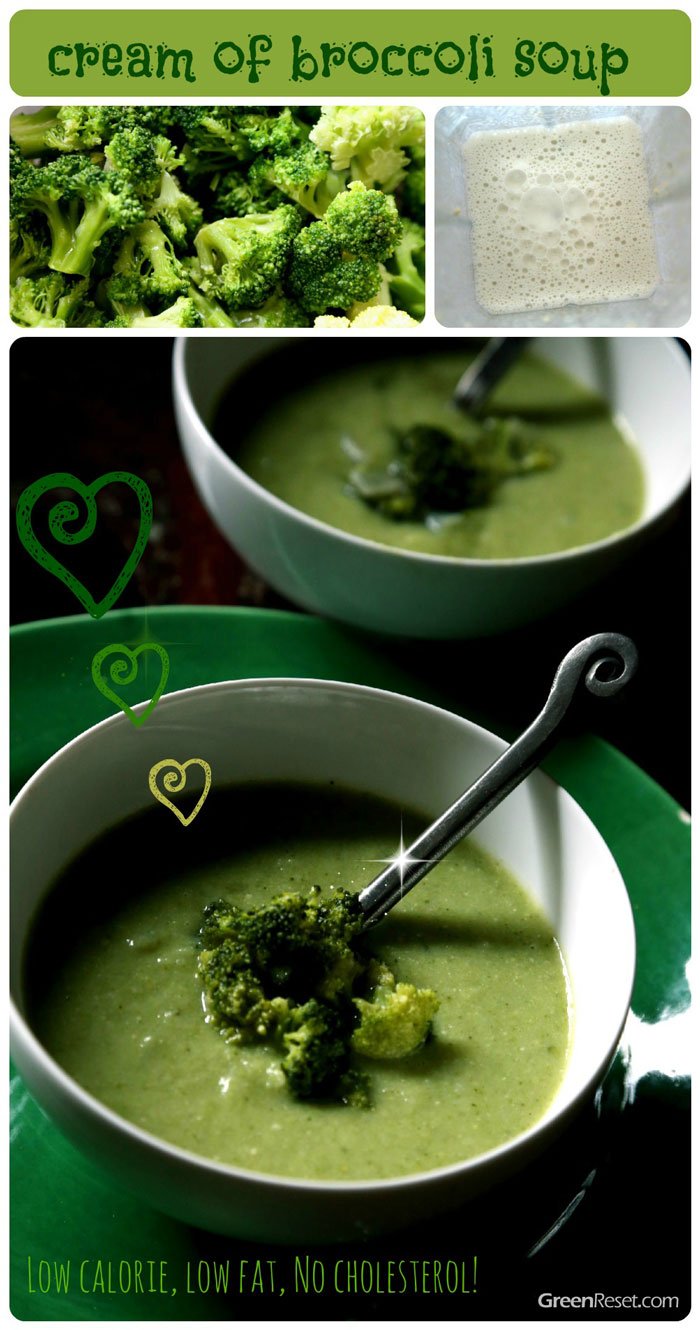
This soup is quick and easy to make, it’s super nutritious, healthy, and really yummy. Broccoli are have no saturated fat and zero cholesterol. It is also a good source of Protein, Vitamin E (Alpha Tocopherol), Thiamin, Riboflavin, Pantothenic Acid, Calcium, Iron, Magnesium, Phosphorus and Selenium, and a very good source of Dietary Fiber, Vitamin A, Vitamin C, Vitamin K, Vitamin B6, Folate, Potassium and Manganese.
For all my blending recipes I use Vitamix. If you don’t already own a VitaMix, I strongly encourage you to check out what this machine is capable of! For more information about VitaMix you can go directly to the VitaMix website. You may also want to read my post about the Best Blender.
I LOVE my VitaMix and highly recommend investing in one if you are ready to make serious changes to your diet. I have had mine for almost 5 years and use it daily!
If you decide to purchase Vitamix – be sure to use Promotional Code 06-004554 to get free shipping.
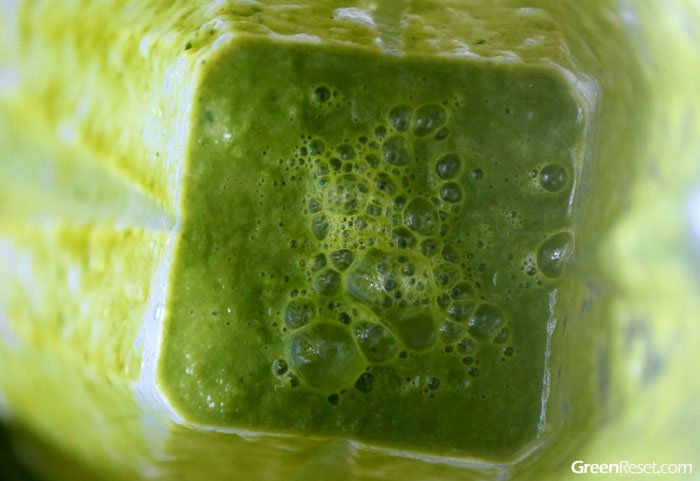
The Making of Cream of Broccoli Soup: Blending soup in Vitamix
Questions? Comments? Suggestions?
If you have a favorite recipe, why not submit it here in the comment section of this green smoothie and healthy recipes blog for others to enjoy too!
I also welcome any comments, questions and suggestions. Thanks!
Cabbage is often unappreciated, but it’s worth to make an effort to consume more of it, because of all the health benefits that it provides. Cabbage can be used in many cooking recipes, but it’s worth to consume lots of it raw for maximum benefits.
For most people, the appeal of cabbage juice lies not in its taste, which is rather bitter, but in the many health benefits you can derive from drinking it. A member of the healthy cruciferous family of vegetables that also includes broccoli and cauliflower, cabbage contains a wealth of micronutrients as well as a wide array of phytochemicals with a similarly broad variety of medicinal properties.
Salads and juicing are two popular ways to eat raw cabbage, as well as sauerkraut (cultured cabbage), but I have found that it can also be used in smoothies, as adding a small amount of cabbage to green smoothie will hardly be noticeable in many recipes.
Cabbage has been shown to reduce the risk of some cancers, especially those in the colorectal group. Cabbage provides fiber, vitamins A, C, K and B6, folate, potassium, manganese, thiamin, calcium, iron and magnesium.
Purple cabbage also contains anthocyanins, which in other vegetables have been proven to have anti-carcinogenic properties. Along with other cole crops, cabbage is a source of indole-3-carbinol, a chemical that boosts DNA repair in cells and appears to block the growth of cancer cells. Research suggests that boiling these vegetables reduces their anti-carcinogenic properties.

Just looking at the Nutrition Facts from Nutritiondata.com will tell you that it’s very beneficial for weight loss and optimal health. No wonder, almost 90 grams of cabbage has only about 20 calories. And the glycemic load is almost negligible – very important for people with blood sugar issues.
The good news about cabbage, and other calciferous veggies, is that you can eat all the cabbage you want, practically stuffing yourself, and you still will not gain weight.
Select cabbage that is heavy for its size with leaves that are unblemished and have a bright, fresh look are signs of desirable quality. Whole cabbages are preferred whenever possible as pre-cut or preshredded cabbage has a greatly diminished vitamin content. Peak season for most cabbages runs from November through April.
Fresh whole cabbage will keep in the refrigerator for one to six weeks depending on type and variety. Hard green, white or red cabbages will keep the longest while the looser Savoy and Chinese varieties need to be consumed more quickly. It is necessary to keep the outer leaves intact without washing when storing since moisture hastens decay.

Green Cabbage Smoothie Ingredients
Time to make some green smoothies with cabbage!

green-cabbage-smoothie9b
Green Cabbage-Apple Smoothie

Red cabbage smoothie
Red cabbage smoothie

Beet cabbage smoothie
Beet Cabbage Smoothie Recipe
Submit Your Smoothie Recipe!
When you find a taste you love, why not submit your favorite smoothie recipe in the comment section below!
Find more smoothie recipes and tips on my blog.
One of the biggest concerns that individuals have when considering the option to go vegan is whether or not they will be able to receive the proper amount of protein that their bodies need. This concern is amplified ten-fold when it comes to fitness-oriented individuals like bodybuilders and athletes.
Well, the answer is that it’s very easy to be able consume enough protein as a vegan, even for athletes and weightlifters.
The key to promoting fitness in the body and maximizing the benefits of working is out highly dependent on post-workout nutrition. It is absolutely essential to take in lots of carbohydrates and protein after a workout so that the muscles can jumpstart the recovery process.
To that light, the following smoothies are great choices for the vegan who wants to make a quick post-workout drink.
Super Sweet Banana Nut Protein Blaster
Ingredients:
-one banana
-one tablespoon of agave syrup or molasses
-half a cup of almonds
-a quarter cup of organic granola
-a quarter cup of raisins
– two scoops of vanilla Sun Warrior vegan protein powder
-one cup of soy milk
-a handful of ice cubes
This one’s really sweet so beware! Take the banana and chop it up into little slices. Next, throw in the almonds, the granola, and the raisins and pour in about half of the milk. Blend for a good minute. Toss in the protein powder and the agave syrup (or the molasses if that’s what you’re using) and throw in the ice-cubs. Blend until smooth and pour yourself a nice cup of delicious, energy packed nutrients for a solid post workout meal.
No Such Thing as Too Much Berry
Ingredients:
-one cup strawberries
-half a cup of blueberries
-half a cup of raspberries
-half a cup of blackberries
-half a banana
-one and a half cup of vanilla flavored almond milk
-two scoops of vanilla Sun Warrior vegan protein powder
-a handful of ice cubes
This one is very popular! Toss the strawberries in with the half banana and pour in half the cup of almond milk. Blend for a solid minute. Pour in the rest of the berries, the protein powder and the milk and blend until it is smooth. The vanilla flavored protein powder combined with the vanilla flavored almond milk will give this smoothie a strong base that combines very well with all the berries. This smoothie will energize as well due to all the antioxidants found in the various berries.
Not Your Grandma’s Oatmeal Cookies
Ingredients:
-half a cup of steel cut oats
-one tablespoon of all natural peanut butter
-two teaspoons of brown sugar
-two scoops of chocolate Sun Warrior vegan protein powder
-one cup of unflavored almond milk
-a handful of ice cubes
-a cup of water
This one takes a bit of preparation, but it’s well worth it! Heat the oatmeal in the cup of water until it’s cooked. A cup should be enough to make the oatmeal watery, but if not, use more. Mix the oatmeal with brown sugar and the protein powder and toss into the blender. Throw in the almond milk and ice cubes and blend! This one can get pretty heavy because of the oatmeal, but what better way to get in all your clean carbs and protein in one shot? This can be a great morning meal as well as a post workout smoothie.
Any of these protein packed smoothies make an amazing choice for a post workout recovery drink. As a general rule of thumb the amount of ice used is really a personal preference so don’t be afraid to experiment until the consistency of the smoothie is suitable. Also, the smoothies described here are on the larger side – they are meant to take advantage of the post-workout need for calories and energy. The option to make the smoothies and split them into two serving is there as well.
Cherries have some amazing health properties and taste great in smoothies. Since they are not available year-round, I often buy them frozen and use in different variations of this cherry smoothie recipe.
By many, they are considered a “super-fruit”, packed with antioxidants called anthocyanins which aid in the reduction of heart disease and cancer. They are rich in vitamins C, E, potassium, magnesium, iron, folate and fiber, and an excellent source of beta carotene (vitamin A). In fact they contain 19 times more beta carotene than blueberries and strawberries.
You may not know that (I didn’t), but cherries are one of the few food sources that contain melatonin, an antioxidant that helps regulate heart rhythms and the body’s sleep cycles. They are also often referred to as “brain food”, aiding in brain health and in the prevention of memory loss.
Because of their powerful anti-inflammatory benefits, cherries are said to reduce pain and joint soreness for runners and athletes after workouts.
Pomegranates add a delicious flavor and a big dose of antioxidants to smoothies.
Both pomegranates and cherries contain powerful cancer fighting antioxidants. Anthocyanins are the antioxidant that give them their red color. It is this antioxidant that studies have shown to have anti-inflammatory properties and may help with symptoms of arthritis.
I didn’t add any greens to the smoothie initially, because I just came back from a trip and didn’t have any fresh greens on hand. After I tried it (and took the picture), I added 2 cups kale to make it into a green smoothie. The cherry and pomegranate flavors blended with banana were sufficient enough to mask the greens, but you may have it without the greens, for a change, too.
Pomegranate & Cherry Smoothie
Ingredients
- 1/2 cup fresh pomegranate juice or 1/2 fresh pomegranate
- 2 cups frozen cherries
- 2 ripe bananas
- 3 cups chard or other leafy green (optional)
- 1 cup water (optional if needed) (you may substitute all or part of the water with some almond milk for more creamy texture)
Instructions
- Start by adding the liquid to your blender (I use a Vitamix), followed by the soft fruit. Blend on high for 30 seconds or until the smoothie is creamy.
- You may juice the pomegranate, by emptying the seeds in a strainer and smashing them with a spoon. Pomegranate juice stains, so be careful!
- If you have a high powered blender, you don’t need to juice the pomegranate. Just cut it in half and scoop the seeds into the blender.
3.1
https://greenreset.com/cherry-smoothie-recipe/

Beautiful photo of cherries. I didn’t take it – I used frozen cherries that look very photogenic…

Cherry Pomegranate Smoothie – all gone!
For all my blending recipes I use Vitamix. If you don’t already own a VitaMix, I strongly encourage you to check out what this machine is capable of! For more information about VitaMix you can go directly to the VitaMix website. You may also want to read my post about the Best Blender.
I LOVE my VitaMix and highly recommend investing in one if you are ready to make serious changes to your diet. I have had mine for almost 5 years and use it daily!
If you decide to purchase Vitamix – be sure to use Promotional Code 06-004554 to get free shipping.
Questions? Comments? Suggestions?
If you have a favorite recipe, why not submit it here in the comment section of this smoothie recipes blog for others to enjoy too!
I also welcome any comments, questions and suggestions. Thanks!
Perfect basmati rice will have separate fluffy rice grains, without any rice that is undercooked or overcooked. Basmati rice is different from many other types of rice in that it is drier; for example, it is drier than sushi rice.
Use a Rice Cooker to Make the Perfect Basmati Rice
Fuzzy logic rice cookers are an excellent way to make perfect basmati rice almost every time. You need to be careful to put the right amount of water in the cooker for the amount of rice you are making. Before cooking the rice, don’t forget to rinse it. For truly fluffy rice, soak the rice in cool water for 20 minutes before putting it in the rice cooker. You can add dried spices to the rice before cooking it for a rich flavor.
For basmati rice, you will need at least one and a half cups of water per cup of rice. You also need to select the right cooking setting. For basmati rice of the Asian style, use the white rice setting. For crunchier basmati rice, soak the rice in salt water for 20 minutes with at least one tea spoon of rice per cup of water, and then cook it on a harder menu selection. However, for the best results when cooking basmati rice in a rice cooker, do not add lentils to the rice before cooking it. Instead, cook the lentils separately and add to the final dish.
Proper Technique on the Stovetop Cooking of Basmati Rice
If you are cooking rice on a stovetop, set a pot full of water a burner set to medium heat. Let the rice soak in cold water for about 20 minutes before draining the rice. Wait until the rice hits a full boil before acting. Then set the burner to a simmer temperature. Put the rice into the pot, then put a lid on top of it. Set a timer for twenty minutes. Then let the rice cook. When the rice is cooking, be careful not to open the lid. This lets the steam and heat out and causes the rice to come out undercooked. When the timer goes off, immediately take off the lid and start fluffing the rice with a large spoon. Don’t press the rice down or against the side of the bill. At this point, you can add any spices, oil, sauces or butter.
Making Perfect Basmati Rice in the Microwave
Rinse the rice for 20 to 30 minutes in cold water. Pour the rinse water down a drain. Place the rice in one and a half cups of water for each cup of rice in a microwave safe bowl. Put the dish in the microwave, but leave the rice uncovered. Run the microwave on high for 15 minutes. You can stop the microwave before the fifteen minute mark if steam escaping from the rice is leaving holes in the rice. Then put a cover on the dish and run the microwave for another five minutes on high power. When the microwave is done, take the rice dish out. Set in on the counter with the lid still in place. Let the rice sit for five more minutes with the lid on, essentially simmering. Now take the lid off and fluff the rice with a spoon or fork. At this point, you can add spices, seasoning or sauces.
Most people stick to the same old boring white or brown rice, but you can add new types of any food to your menus without much fuss. Don’t be afraid to try basmati rice.

How to cook basmati rice (Photo: http://www.flickr.com/photos/cookbookman/6121427720/sizes/l/in/photostream/)
About the Author
Jennifer Bachman has been making gluten free foods for her family for over 3 years now. She uses her rice cooker almost daily for all sorts of easy one-pot healthy meals.
Questions? Comments? Suggestions?
If you have a favorite recipe, why not submit it here in the comment section of this smoothie recipes blog for others to enjoy too!
I also welcome any comments, questions and suggestions. Thanks!


